How to Publish Your 3D Accessory to Marketplace
Learn how to design accessory for Roblox in Altava, download them, publish them to Roblox Studio, and use them in your game.

Note: In this guide, we'll walk you through the process of uploading accessories to Roblox. The process for uploading layered clothing, such as shirts, jackets, and dresses, may differ. (Follow the link to learn how to upload your outfit.)
Before you begin, 1️⃣ : Please make sure you have Roblox Studio installed on your desktop. (**Roblox Studio** DownLoad) 2️⃣ : Create a Roblox account if you don't already have one. 3️⃣ : Age verification and 750 Robux in your Roblox account are required.
Step 1: Download the design for Roblox from Altava
The first step is to download an accessory design created in ALTAVA. You can download your desired accessory from the Design Lab or the My ALTAVA page.
Download Credit will be required to download FBX files.
- If you run out of credits, please sign up for a PRO subscription to get more credits.
- If you are already a PRO user, please wait for your credits to renew.
Step 2: Upload the 3D model to Roblox Studio
After downloading your design from Altava, you will receive a FBX file. Import the file into Roblox Studio.
Importing the FBX file into Roblox Studio
- Start Roblox Studio(Download) and sign in with your Roblox account.
- Create a New Template.
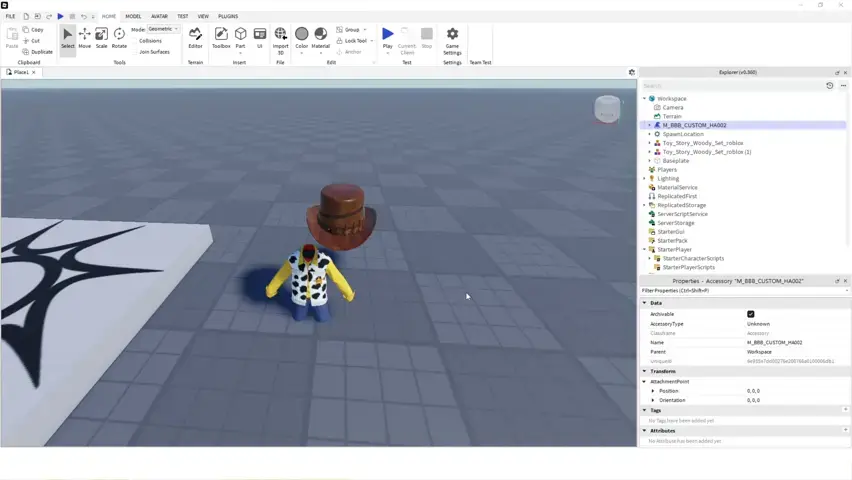
- Select ****[AVATAR] from the top menu and click [Import 3D].
- Select the file downloaded from Altava, and click the [Import] button.
Step 3: Modifying SurfaceAppearance and Mesh Settings
Change the SurfaceAppearance setting from Transparency to Overlay,
 and set the Double Sided option of the active Mesh to disabled (unchecked).

Step 4: How to convert Roblox Hat, Roblox Bag items
Congratulations — you're now ready to publish! Next, use the [Accessories Fitting tool] to convert your accessory into a standard accessory item your avatar can equip.
4-1: How to convert Roblox Hat, Roblox Bag items
- Select [Accessory Fitting Tool] from the [AVATAR] menu.
- In the [Accessory Fitting Tool], select the model you’ve just uploaded.
- It's okay if the Part name is not the same as the one you set. (* The Part name is the name of the Mesh)
- Select the asset type and set the category for each garment.
- Hat: Under Accessories, select Hat.
- Bag: Under Accessories, select BACK.
- Adjust the position, size, and orientation of the accessory
- See section 4-3 for how to adjust the accessory’s position, size, and orientation.
- Change [Generate MeshPart Accessory] to [Generate Legacy Accessory], and click on it.
- A new accessory item will be added to Explorer.
- See section 4-4 to preview your accessory on a Roblox avatar before publishing.
4-2: How to convert Roblox Shoes item
ALTAVA shoes require a left shoe and a right shoe to be listed, the same as the Roblox shoe policy.
- Select [Accessory Fitting Tool] from the [AVATAR] menu.
- Select the shoes of the loaded model in the [Explorer].
- Expand the subfolder of the selected model.
- Select {filename}_left or _right.
- Click Generate MeshPart Accessory to convert.
- Once the fitting is complete, update the model's Accessory Type and Name according to the direction.
 Example: You must make the changes exactly as shown below. Any deviation may cause errors.
- AccessoryType → Left Shoe
- Name → LeftShoeAccessory
- AccessoryType → Right Shoe
- Name → RightShoeAccessory
A new item will be created in the Explorer.
4-3: Changing the size and position of the item
- The [Accessories Fitting Tool] allows you to change the size and position of your item.
- Adjust the accessory's size and position
- Use the following functions from the Menu Home: 1. Move 2. Scale 3. Rotate.
- Check how it looks on the Roblox avatar in the Accessories Fitting Tool while adjusting size and position.
- If the blue box surrounding the mannequin turns red, please resize or reposition it.
4-4: Accessory Try-On Preview
- In the Explorer, put the accessory item into [StarterCharacterScripts], which is under [StarterPlayer].
- Press the [Play] button on the Home tab to activate playtesting in Roblox Studio.
- Move your roblox avatar to check the size and position.
Step 5: Publish to Roblox
Finally, you're ready to publish your item to Roblox.
How to save on Roblox
- In Explorer, right-click the accessory item
- Click [Save to Roblox] at the menu.
- Enter the title and description for the item. (The title and description will be displayed on the Roblox Marketplace)
- Change the Content Type to Avatar Item. (The development item is used to save items for development purposes.)
- In Asset Category, select the category for the item you are uploading.
- Enter the Asset type (Roblox Tag) if needed. (You can publish without entering it.)
- Click the [Submit] button.
⚠ Please check before publishing: 1️⃣: Each time you upload an item, it costs 750 Robux. Also, there are additional fees for listing items on the Roblox Marketplace. 2️⃣: If you don't verify your identity, your registration will fail. (Please ensure you are using a verified Roblox account) 3️⃣ : Group the left and right shoes using Ctrl+G before saving them to Roblox, then proceed.
Once your registration is complete, wait for the item to pass Roblox’s review before you can sell it on the Roblox website.
- Publishing information can be found in the “Roblox Creator Hub”.
- Please check Publishing Advance for registration costs.
Latest News
WOY Service Termination Notice
WOY Application Service Termination Notice

How to Create and Monetize 3D Fashion UGC Without IP Risks
How to safely create and monetize 3D fashion UGC without IP risk
The Best 3D Design Platform Under $5/Month
Why Altava.ai is the most affordable way to create 3D outfits